Do you want to start a blog but aren’t sure where to start? Here I’ll walk you through 4 Easy Steps to Start a Blog and give you tips along the way.
I enjoy blogging for a variety of reasons —
- Blogging is a wonderful outlet for my creativity.
- I’ve learned to be a better cook as blogging extends my culinary abilities.
- I’m a better photographer thanks to what I’ve learned through blogging.
- Blogging provides a regular income for my family.
- I’ve made some amazing friends online though my blogging.
- I’ve helped my readers with educational printables, easy recipes, and ideas for family fun. Their encouragement keeps me going and keeps me connected with an awesome online community!
Want to join me in this incredible world of online connections and get started blogging? Well, here’s a tutorial to help you get started.
Step 1 to Start a Blog: Select a Blog Name
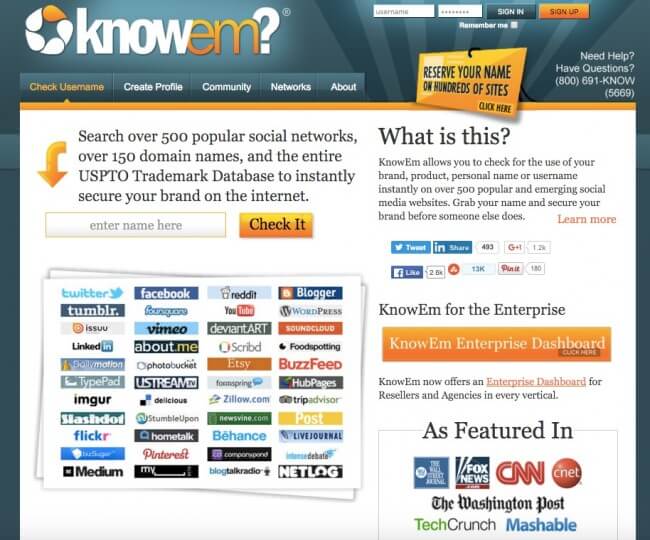
Before you start blogging you want to consider what you’d like to blog about. Think about your strengths and passions. What motivates you, what gets your wheels turning with creativity? Jot down those ideas and start crafting a name for your blog from your favorites. You want the name of your blog to reflect who you are and what the blog will be about. Once you’ve brainstormed a few ideas, check the availability of the name at Knowem.com.
To check the potential blog name, type your idea (without the .com) into the field that says “enter name here” then click “check it”. Scroll down to see if the .com is available and what social media channels are available. This will also tell you if the name is too long for Pinterest, Facebook or other forms of social media.
You can use Knowem.com to register your new name on a bunch of sites, but I don’t think it’s worth it. Just click on each icon and Knowem will send you to that social media outlet where you can register the name yourself (more on that later). Of course, you’ll need to sign up for Web Hosting and secure the domain name before you do this, but at least now you know if it’s available and if it’s the right length for most social media outlets.
Now that you know your new blog name, we proceed to Step 2 and set up a new domain with web hosting.
Step 2 to Start a Blog: Sign up for Web Hosting
If you ever want to make money blogging, I strongly recommend a self-hosted Word Press site. Only a self-hosted Word Press site will allow you to take advantage of thousands of plug-ins (pieces of code that attach to your site to give it awesome functionality) and give you the greatest opportunity to make money. Signing up for a free blogging platform is like sticking with a cordless phone and then wondering why the iPhone or Google Play cell phone apps will NOT work on it.
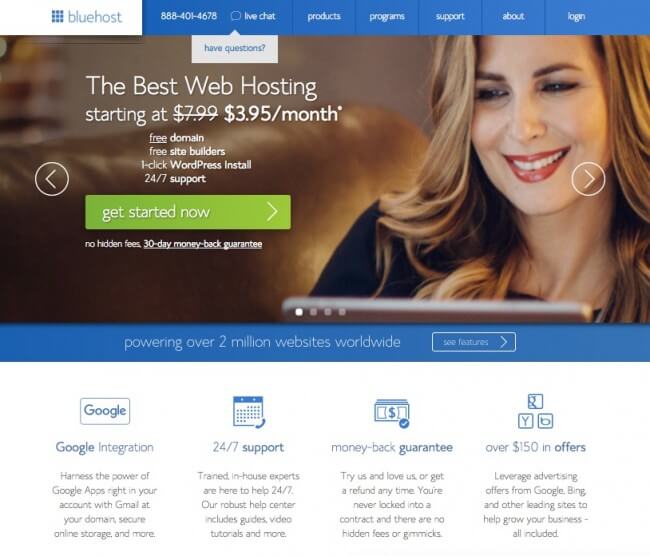
HappyandBlessedHome.com has been hosted on BlueHost since I decided to start blogging professionally (3+ years with Blue Host). I am very comfortable recommending them because they host over 2 million web sites worldwide and offer 24/7 technical services. You can call Blue Host at any time at 1-888-401-4678. Plus they’re very affordable, with rates as low as $3.95 per month. For the lowest prices you have to pay for 36 months up front. But if you decide to cancel for any reason, BlueHost will refund any unused portion of your plan so you’ve go nothing to lose.
Traffic levels have necessitated that I upgrade HappyandBlessedHome.com to the Blue Host Pro plan, but the improved site speed has been worth every penny. If you’re looking for a reliable and affordable hosting solution, Blue Host is the way to go.
To sign up for Web Hosting with Blue Host go to this link: BlueHost Web Hosting and click the green “get started now” button.
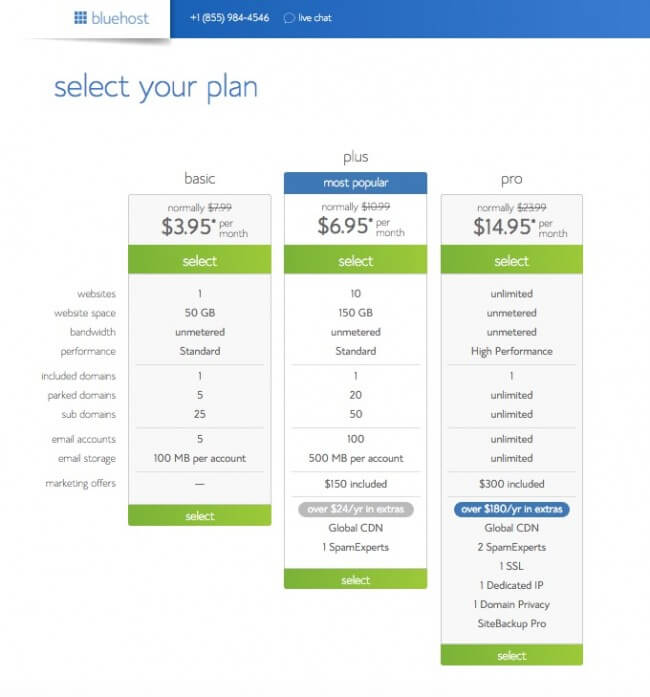
Once you click the green “get started now” button you’ll be given a few options to choose from for Web Hosting. Pick the plan that best meets your needs (don’t worry if the screens look a bit different from the ones you see here – the process to sign up is the same).
The biggest difference from the lowest and medium priced plans is something called Global CDN. Just as an FYI, A content delivery network or content distribution network (CDN) is a globally distributed network of servers deployed in multiple data centers. The goal of a CDN is to serve content to end-users with high availability and high performance (speed). If you want your blog to draw traffic from multiple locations (i.e. all over the world), you’ll want to select one of the higher priced options that includes Global CDN.
If you’re just starting out and you’re on a very tight budget, the lowest priced alternative may be the right selection for you. Once you’ve picked the plan you need, you will enter the domain name you tested on Knowem.
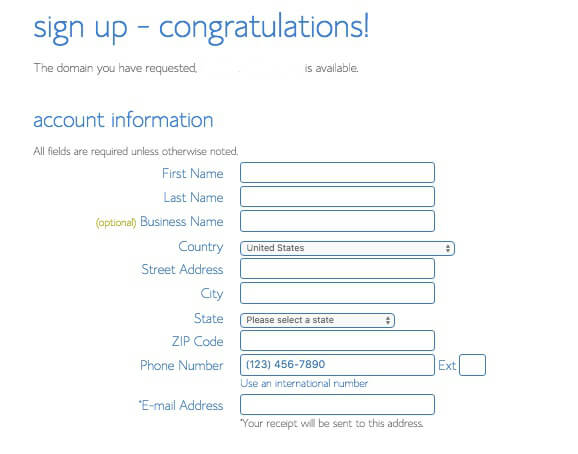
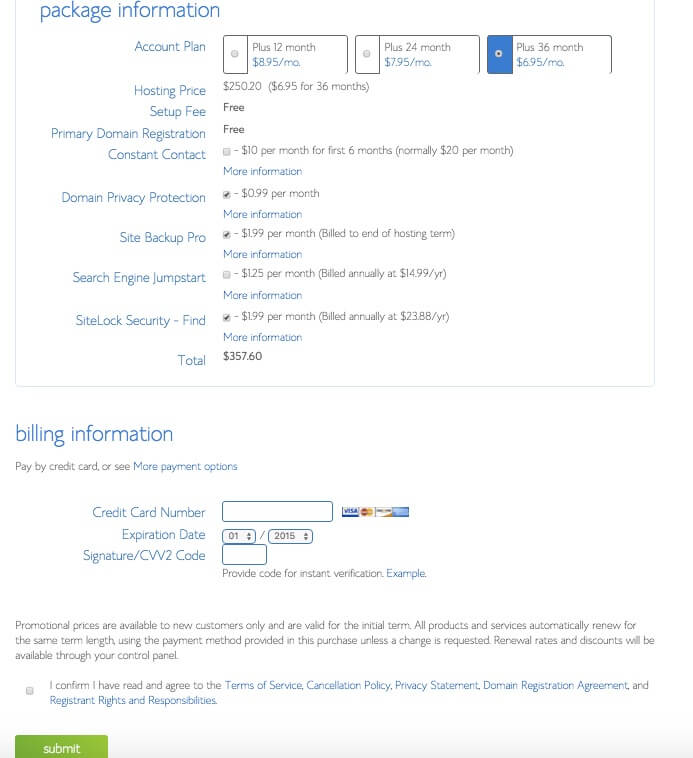
From there, you need to set up your BlueHost account. They’ll need your name, business name and ways to contact you. For now, I recommend you skip all the other add-ons except Domain Protection. I highly recommend you use Domain Protection to keep creepy-crawly types from finding out where you live and who you are. Domain Protection will not show up if you transferred a domain to BlueHost. I use Domain Protection on my blog and all other domains I have registered.
BlueHost will take care of registering your new domain name (blog name at the .com or dot.extension address).
Of course, you’ll also need to provide your credit card information for payment. You’ll notice that BlueHost will automatically renew unless you notify them otherwise.
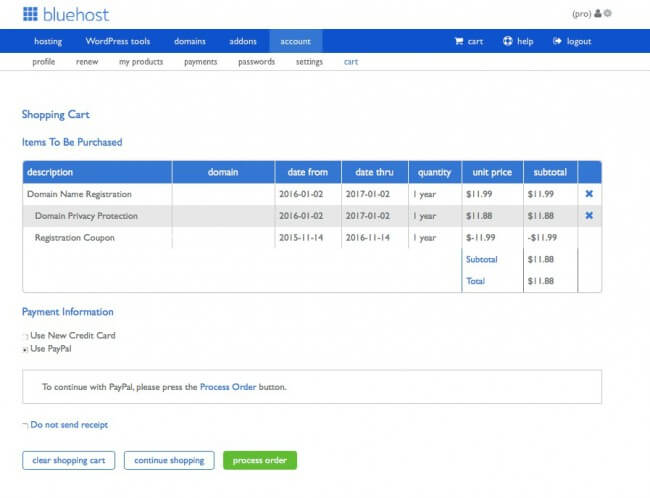
You can choose PayPal or a Credit Card to check out. Once you click “submit” you’ll see a summary of your order and the charges associated with it. I get a free domain name each year so all had to pay for was the domain protection. I believe that if you sign up with BlueHost your first domain registration is free.
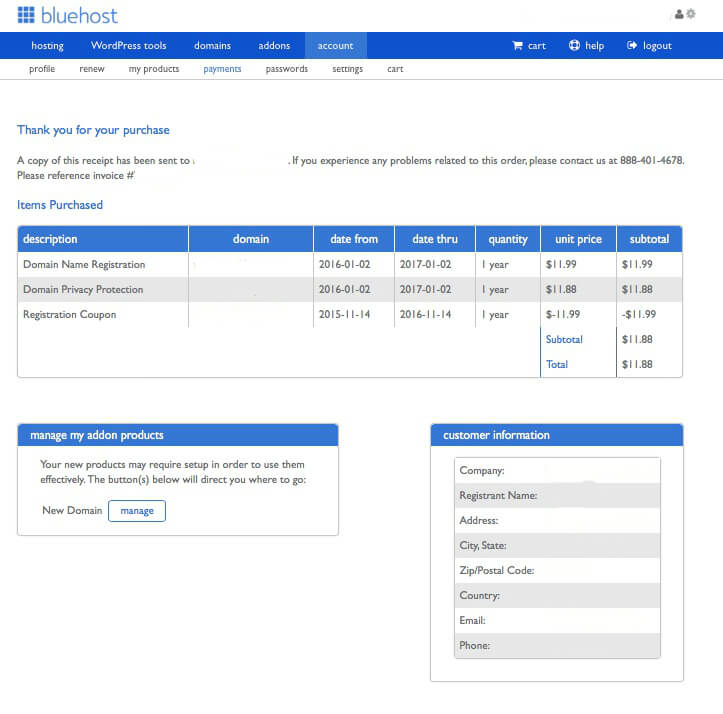
OnClick “Process Order” to complete your order. From there, you’ll get a “Thank you” for your order and the associated charges. It will also come to you in an e-mail.
Now you are all set up with BlueHost Web Hosting and a domain name and URL. But you can’t type your new URL into google just yet… You need to install WordPress and select a design (theme) for your blog.
Step 3 to Start a Blog: Install WordPress
Upon receipt of your confirmation e-mail, log back into BlueHost. You’ll use the username you registered with and your password. If at any point you forget your BlueHost Password, just click “forgot password” on the BlueHost login screen and BlueHost will send you an e-mail with a link to reset your password.
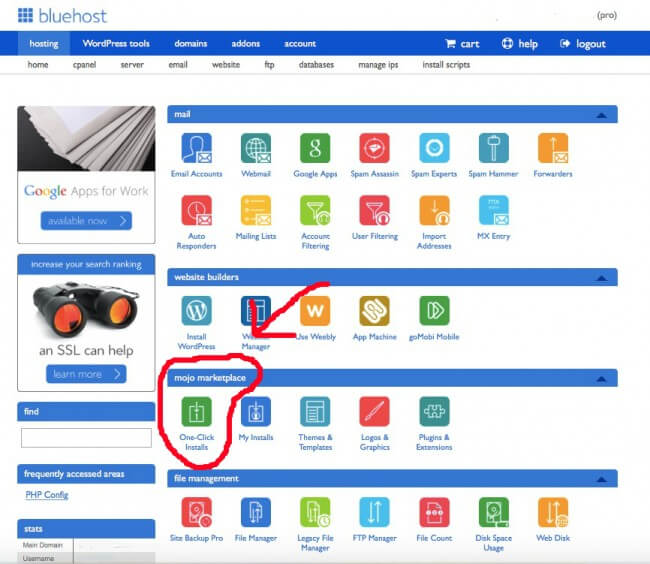
Once you login you’ll be on the “C-panel” – I like to think of it as the “control” panel. Make sure you’re on the “hosting” tab. BTW – if you ever get stuck on your c-panel call BlueHost. They have a marvelous group of technical folks who helped me tremendously the first time I did a WordPress Install.
Once you’ve logged in, look for something that says “MOJO Marketplace” and you want to select the icon that says “One click installs.”
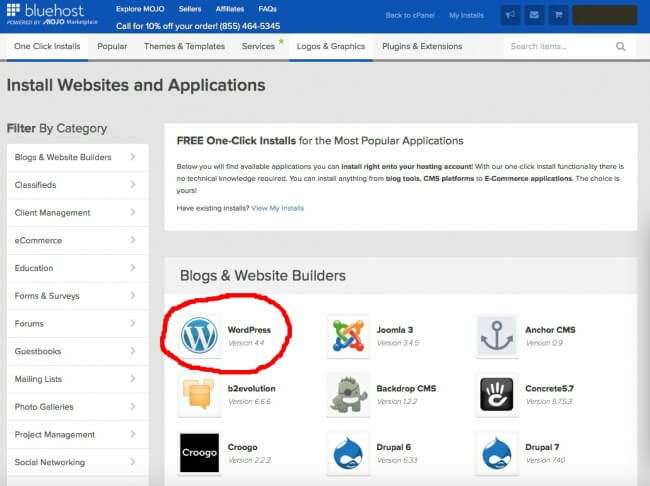
Once you click “One-Click Installs” you’ll arrive at a screen where you will select “WordPress”.
Next step – click on the green button that says: “Install.”
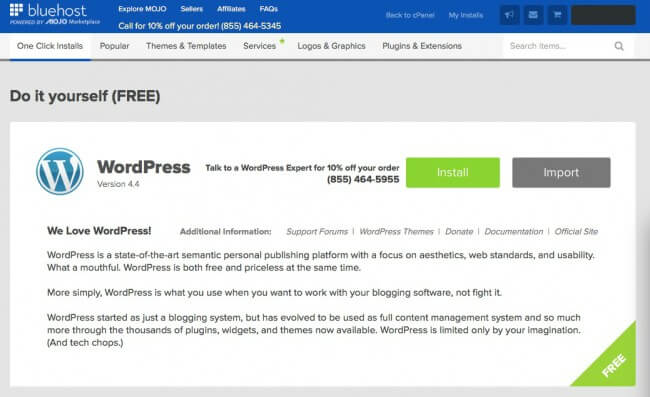 Choose the domain name to install it to.

In the field next to the domain, you can enter a subfolder such as ‘blog’ or leave it blank if you want the site’s main page to be the blog.
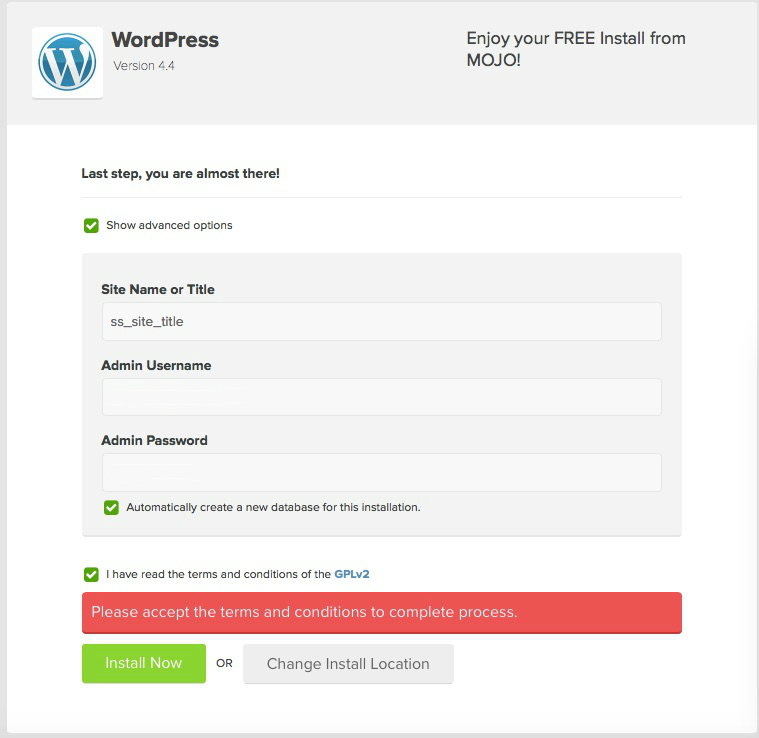
- If necessary, you can edit the email address, username and password for the new WordPress installation. Click “advanced options” and you can change those settings.
- Read through the license and service agreements and check the boxes.
- Select the Install Now button.
It may take a few minutes for the install to complete on your new blog/web site. You should see a screen that looks like this after the install – make note of your username and new password (the password will be filled in – I blanked it out for this example) – since it’s the password you’ll use to access your new blog’s website. You can change it from the dashboard inside of WordPress later.
In case you’d like to see the install via video, here is a short video to walk you through setting up your new Word Press website on BlueHost.
Once you’ve installed WordPress you’re ready to check out your new blog online!
Step 4 to Start a Blog: Login to Your New Blog / Website
Word Press comes with a simple theme you can see when you visit your site. Just enter your new web address. To access the dashboard you’ll need to add a suffix to your domain name. Example: mywordblessblog.com/wp-admin/
The suffix is /wp-admin/
Once you type in mywordblessblog.com/wp-admin/ (make sure you substitute your blog name and extension in place of the “mywordpressblog.com”) you’ll see a login screen like this:
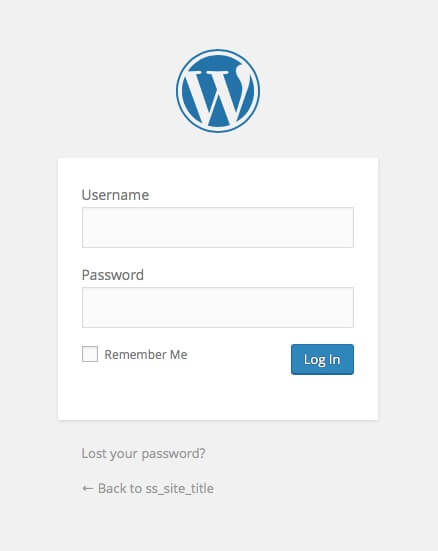
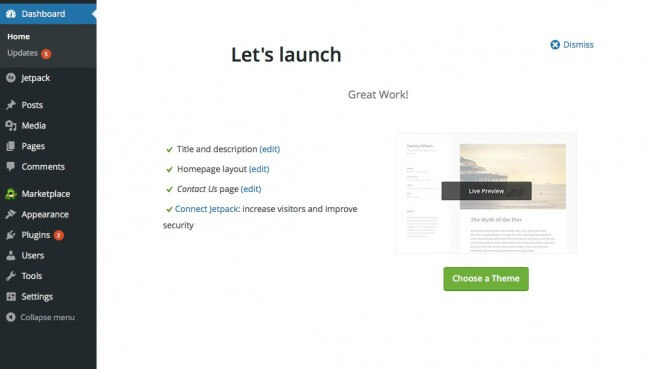
Type in the username and password you saved from the step above and login. Again, if you forgot your password, just click “Lost Your Password?” for an e-mail to walk you through setting up a new password. Once logged in, you should see:
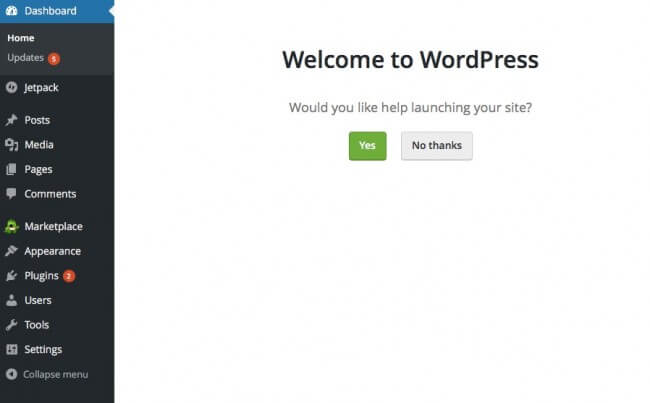
I recommend saying “yes” to “help launching your site”. You’ll set up a static or a history based homepage, you can install a plugin called “Jetpack” (great for beginners), and a “contact us” page. After you say “yes” to everything, you’ll arrive at:
Click on “Choose a Theme” and you can explore options from there. There are many FREE themes to help you get started. I’ll be writing another post in the future on my favorite theme selections and why. Now is also a good time to go back to Knowem and register your blog name with any and all social media outlets that you plan to be on. You want to make sure you lock in your blog name on social media channels like Facebook, Pinterest and Twitter.
To create a new blog post just click on “posts” on the black sidebar on the left hand of your WordPress screen and you’re on your way to publishing online content via your new blog. Congratulations!
Want more of the good stuff?
HappyandBlessedHome.com has hosted over $10,000 in giveaways in the last 12 months. Plus subscribers enjoy loads of free printables and easy recipes. If you enjoy free recipes, printables, crafts and games for little ones, ideas for family fun and encouraging posts for moms, sign up and have Happy and Blessed Home delivered to your inbox. Simply enter your e-mail address here:
What’s the name of your new blog?
Did you find this tutorial helpful? What’s the name of your new blog? Do you have any questions about blogging that I can help with? Please leave a comment below and join the conversation. I love hearing from my readers!
Blog / Facebook / Pinterest / Twitter /Google + / Bloglovin’/ Instagram
P.S. – I blog to encourage moms, offer free preschool tools, and share ideas for family fun. If you enjoy free recipes, printables, crafts and games for little ones, ideas for family fun and encouraging posts for moms, sign up and have Happy and Blessed Home delivered to your inbox. Simply enter your e-mail address here:
If you liked this post for 4 Easy Steps to Start a Blog, you may also like:
 FREE Planner FREE Planner |
 Calendar & Travel Apps Calendar & Travel Apps |
Thanks for being a fan! Do you have a board for blogging on Pinterest? Help spread the word and PIN this post on Pinterest!
